# Creating Sync Workflows

### **Key Concepts**

Before building a sync workflow, it helps to understand a few terms:

* **Source** — the system and record type you're syncing *from* (e.g., Duro – Part Revision)
* **Target** — the system and record type you're syncing *to* (e.g., ION – Part Revision)
* **Trigger** — what causes the sync to generate Pending Changes: either a time schedule, or when Violet identifies changes after fetching new data from the source app
* **Filters** — optional conditions that limit which source records get synced (e.g., only sync parts with Status = "Released")
* **Mappings** — how properties in the source correspond to properties in the target (e.g., source "Part Number" → target "Item Name")
* **Dependencies** — related records synced alongside the main record (e.g., files attached to a part)
* **Pending Changes** — a staged preview of what will be created, updated, or deleted before anything is applied to your target system
* **Sync Batch** — as Pending Changes are identified, they are gathered into a sync batch. These batches hold all of the Pending Changes for a workflow since the last sync was executed.
* **Change Execution** - the actual execution of the changes in the Target system: either a manual approval, a time schedule, or live “on creation” Change Execution. All changes in a Sync Batch will be executed together.

### **Creating a Sync Workflow**

#### **Step 1 — Open the Workflow Builder**

Go to the **Workflows** tab and click <mark style="color:$primary;">**+ Sync Workflow**</mark>.

<figure><img src="https://2091741164-files.gitbook.io/~/files/v0/b/gitbook-x-prod.appspot.com/o/spaces%2FvrraExym8pNEUvBDoima%2Fuploads%2FQs9dgsvtlyGCrJ7f2qr9%2Fimage.png?alt=media&#x26;token=03559741-1db8-48e8-8c5c-ea65af8cb4fe" alt=""><figcaption></figcaption></figure>

If you previously started a workflow and didn't finish, a **Draft available** indicator will appear — the builder will automatically restore where you left off.

#### **Step 2 — Name Your Workflow**

Enter a descriptive name at the top of the canvas. Choose something that makes it easy to identify later, like *"ION → Ramp Purchase Order Sync"*. We recommend including the source and target app names and the type of records being synchronized in the workflow.

#### **Step 3 — Configure Source and Target**

Click the **Source** node on the canvas and select:

* The **source integration** (the system you're syncing from)
* The **source entity type** (the kind of record — e.g., Part, Purchase Order, Task)

Then click the **Target** node and select:

* The **target integration** (the system you're syncing to)
* The **target entity type**

<figure><img src="https://2091741164-files.gitbook.io/~/files/v0/b/gitbook-x-prod.appspot.com/o/spaces%2FvrraExym8pNEUvBDoima%2Fuploads%2FEMbzjP4H4zSKHSNTJDt9%2Fimage.png?alt=media&#x26;token=ff9121fb-bc34-46da-9b15-c6c2fe5a9050" alt=""><figcaption></figcaption></figure>

#### **Step 4 — Set a Trigger**

Click the **Trigger** node and choose how the workflow generate pending changes:

<table data-header-hidden><thead><tr><th width="168"></th><th></th></tr></thead><tbody><tr><td><strong>Trigger Type</strong></td><td><strong>When it runs</strong></td></tr><tr><td><strong>Activity</strong></td><td>Automatically when the source integration is fetched or refreshed</td></tr><tr><td><strong>Scheduled</strong></td><td>On a time interval you choose: every 15 min, 30 min, 1 hr, 2 hrs, 4 hrs, 6 hrs, 12 hrs, daily, or weekly
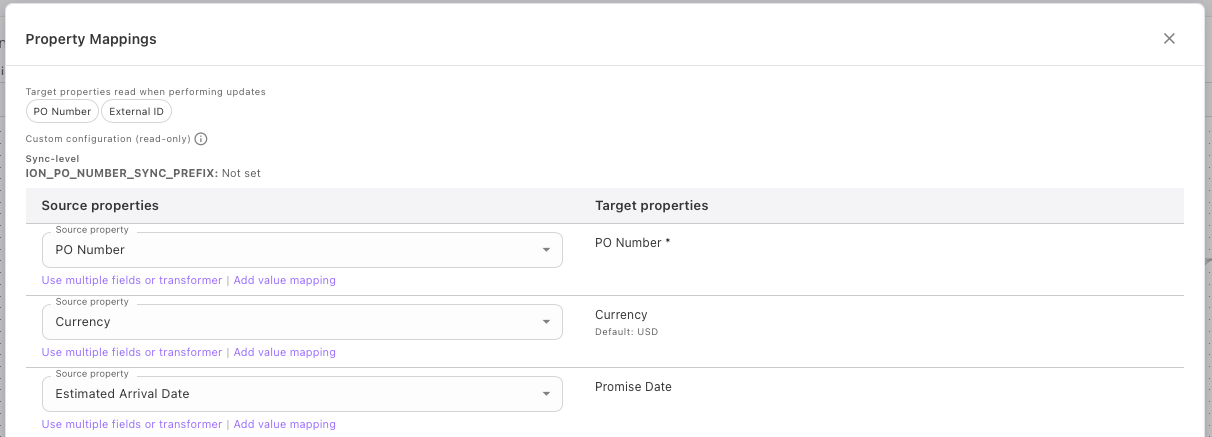
</td></tr></tbody></table>

<figure><img src="https://2091741164-files.gitbook.io/~/files/v0/b/gitbook-x-prod.appspot.com/o/spaces%2FvrraExym8pNEUvBDoima%2Fuploads%2F8Xk2EeYTgKUhZtswQonb%2Fimage.png?alt=media&#x26;token=160b365f-4ad8-4a9b-bd8e-a11572d2c7da" alt=""><figcaption></figcaption></figure>

#### **Step 5 — Add Filters&#x20;*****(optional)***

Click the **Filters** node to limit which source records are included in the sync.

For each filter, choose:

1. A **property** from the source record (e.g., Status, Lifecycle Phase)
2. An **operator** (equals, starts with, ends with, is in, date is after, regex match, and more)
3. A **value** to match against

You can add multiple filters. Filters marked **must pass** act as AND conditions — all of them must be satisfied. Others act as OR conditions.

<figure><img src="https://2091741164-files.gitbook.io/~/files/v0/b/gitbook-x-prod.appspot.com/o/spaces%2FvrraExym8pNEUvBDoima%2Fuploads%2FUYEB5u9sLmSDvYYiDSj8%2Fimage.png?alt=media&#x26;token=b9483c72-3294-470e-80be-f4d82f0681a3" alt=""><figcaption></figcaption></figure>

#### **Step 6 — Map Properties**

Click the **Mappings** node to define how properties from the source translate to properties in the target. Violet will automatically populate likely property mappings between the source and target systems, but you should confirm that they are correct.

* Properties marked with \* are required — they must be mapped before you can save
* Optional properties can be mapped or left blank as needed. If left blank, syncs will not create or update data in that target property during a sync
* For **select/dropdown proprties**, you can also map individual option values (e.g., source status "Released" → target status "Active")

**Mapping options:**

<table data-header-hidden><thead><tr><th width="200"></th><th></th></tr></thead><tbody><tr><td><strong>Option</strong></td><td><strong>Description</strong></td></tr><tr><td><strong>Direct mapping</strong></td><td>Map one source property directly to a target property</td></tr><tr><td><strong>Literal value</strong></td><td>Set a fixed text value on the target property regardless of source</td></tr><tr><td><strong>Concatenation</strong></td><td>Combine multiple source properties with separators (e.g., <code>{Part Number} / {Revision}</code>)</td></tr><tr><td><strong>Transformer</strong></td><td>Apply a built-in transformation (e.g., convert to lowercase, extract a date, strip non-numeric characters)</td></tr></tbody></table>

<figure><img src="https://2091741164-files.gitbook.io/~/files/v0/b/gitbook-x-prod.appspot.com/o/spaces%2FvrraExym8pNEUvBDoima%2Fuploads%2FuT1u5a6y8AIxf631QC6f%2Fimage.png?alt=media&#x26;token=8cd183e6-1c7a-41e6-90b3-0dd916de4b0c" alt=""><figcaption></figcaption></figure>

#### **Step 7 — Configure Dependencies&#x20;*****(if shown)***

Some target entity types have required relationships or related sub-entities. For example, if you're syncing a Purchase Order, the target system may require that it be matched to a Vendor in that system. Similarly, Purchase Order Lines are a sub-entity of the Purchase Order, and they will be synced together.

These dependant syncs appear as additional rows beneath the main sync on the canvas. If your sync has required dependencies, you must configure your integration to fetch those entity types alongside the main entity that you wish to sync (e.g., you must fetch both Purchase Orders and Suppliers/Vendors on the same Integration for both the Source and Target systems). Sub-entities, like Purchase Order Lines, are automatically fetched along with their parent entity - you do not have to do any special configuration to enable this.

For each dependency:

1. **Select the source relationship** — if multiple source relationships could apply, choose which one to use
2. Optionally add **Filters** and **Mappings** specific to that dependency

<figure><img src="https://2091741164-files.gitbook.io/~/files/v0/b/gitbook-x-prod.appspot.com/o/spaces%2FvrraExym8pNEUvBDoima%2Fuploads%2FljdfR35FvFcI19o10W1x%2Fimage.png?alt=media&#x26;token=a05094f9-e210-4c39-b5c8-c85a3be93081" alt=""><figcaption></figcaption></figure>

#### **Step 8 — Save**

Click **Save Workflow** when you're done.

If anything required is missing, the affected nodes will show a **red border with an error indicator**. Click the node to see what needs to be filled in.

On success, you'll be redirected to the Workflows list and the new workflow will appear there.

#### **Step 9 — Choose Sync Change Execution Method**

Once you have saved your Sync Workflow, the Target > Source integration pair will appear in the **All Integrations** list. Click on the integration pair, and then click the gear in the **Execution Configuration:** block to set up the Sync Change Execution Method.

&#x20;

<figure><img src="https://2091741164-files.gitbook.io/~/files/v0/b/gitbook-x-prod.appspot.com/o/spaces%2FvrraExym8pNEUvBDoima%2Fuploads%2FfcTALw1jm6XvxGri02Im%2Fimage.png?alt=media&#x26;token=9fd09d36-f962-4381-8e03-e9e5c81e1aef" alt=""><figcaption></figcaption></figure>

You can choose to execute the sync changes on a **Timer**, or **On Activity**. If you'd like to execute the sync changes **On Activity**, you can choose between a *manual* *approval*, or *automatic execution* each time the sync change creation workflow completes.

<figure><img src="https://2091741164-files.gitbook.io/~/files/v0/b/gitbook-x-prod.appspot.com/o/spaces%2FvrraExym8pNEUvBDoima%2Fuploads%2FgXHicomEDsX1Rhl2BTVV%2Fimage.png?alt=media&#x26;token=516e87c8-a7b6-4823-8a17-1cb2b6acfba1" alt=""><figcaption></figcaption></figure>

***

### **Managing Sync Workflows**

From the Workflows list, each workflow card shows its name, source and target integrations, and current status.

* **Edit:** To edit a workflow, click anywhere on the worflow card.
* **Manually Stage Changes (**<img src="https://2091741164-files.gitbook.io/~/files/v0/b/gitbook-x-prod.appspot.com/o/spaces%2FvrraExym8pNEUvBDoima%2Fuploads%2FD41eLUQ66ztWfx8mQ2O0%2Fimage.png?alt=media&#x26;token=fca824a2-abf0-4b3a-8f95-ead3bfd638b5" alt="" data-size="line">**
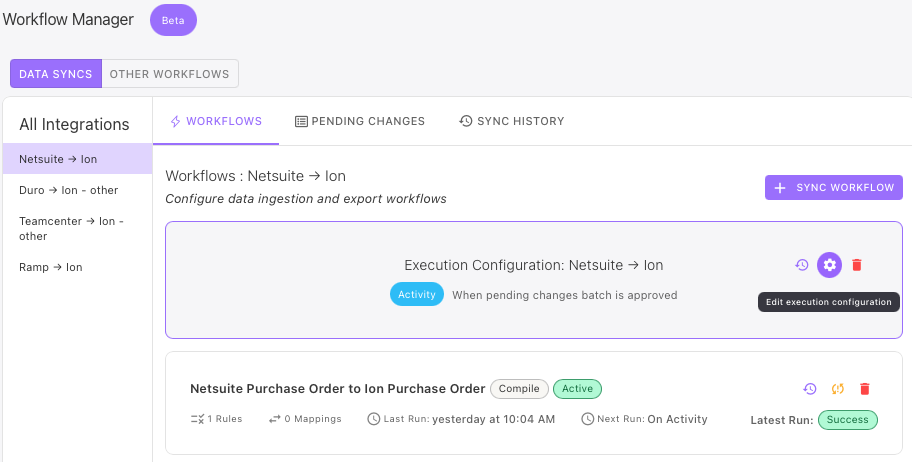
):** Click the "Create Changes for Full Integration" icon to immediately stage pending sync changes for all records in the source system. You can use this for initial changes when you are first setting up your workflow if you don't want to wait for the next source integration fetch.
* **View run history (**<img src="https://2091741164-files.gitbook.io/~/files/v0/b/gitbook-x-prod.appspot.com/o/spaces%2FvrraExym8pNEUvBDoima%2Fuploads%2F4IFOJyH4FdXmxqleBNRw%2Fimage.png?alt=media&#x26;token=70bfbb64-f6fb-46fd-957e-2bf759ddc2ec" alt="" data-size="line">**):** Click on the history icon to view historical syncs. You can see the status of each historical run, as well as the sync'd changes and the status of each change.
* **Delete (**<img src="https://2091741164-files.gitbook.io/~/files/v0/b/gitbook-x-prod.appspot.com/o/spaces%2FvrraExym8pNEUvBDoima%2Fuploads%2FUxTon9pv8KzaDgQhCi2t%2Fimage.png?alt=media&#x26;token=9c775919-0420-4894-8593-d0949f8c1c72" alt="" data-size="line">**):** Click the delete icon to delete the Workflow.

### **Drafts**

The builder automatically saves your work as a draft in your browser as you go — no manual save needed.

* A **Draft available** badge appears on the Workflows tab if you have an unsaved draft
* If you navigate away, you'll be asked whether to **keep the draft**, **discard it**, or **go back**
* You can clear a draft manually at any time using the **Clear Draft** button inside the builder

> ***Note:** Drafts are stored in your browser and will not appear on other devices or after clearing your browser data.*
